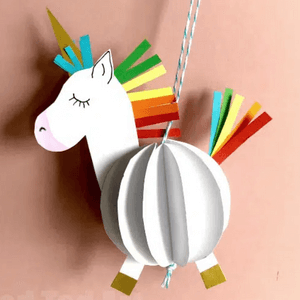
3D Paper Unicorn Decoration

Materials Used
- One sheet of white A4 paper
- Some colored paper scraps (or use pens to decorate some white paper)
- Some gold paper (or use silver foil or make your unicorn horn pink!)
- Glue stick
- Twine for hanging (we used this gorgeous Blue & White Twine)
- Pens for decorating
Instructions
Preparing the Paper Unicorn Head
- Sketch out an unicorn head. You will need 2 of these facing in opposite directions (draw one, get two pieces of paper, cut 2 at the same time.. flip one over)
- Add details in pen – e.g. for the ear, eyes and nose
- Cut some rainbow paper strips – red, orange, yellow, green and blue – made them very narrow – 2mm wide and about 3-4 cm long (but you will trim them later).
- Add a little glue to your unicorn head and start sticking down your main. Stick it as neatly to the edges as you can as sometimes the line is visible through the white paper.
- Add the golden horn
- Add some extra main to the other side of the horn, so it matches both sides.
- Glue on your second head piece, so that your paper unicorn is pretty on both sides.
Preparing the Paper Unicorn Tail
- An extra red, orange, yellow, green and blue strip of paper – again approximately 2mm wide and 3-4 cm long and put those to one side.
Preparing the Paper Unicorn Legs
- Cut strips of white paper 1cm wide and 2-3 cm long.
- Cut gold strips of paper – approximately 1cm wide 1.5cm long. Fold in half. You don’t have to use the gold, you can use pens to draw on some hooves too.
- Glue over the bottom of the white strips of paper to form a golden hoof. Trim to neaten.
- Put to one side.
Make your Paper Unicorn “Bauble” Body
- Cut 9-10 white circles and then fold the circles in half.
- Add glue to one half of the circle and lay a second circle on top.
- Continue until all half circles are stuck together.
- Now cut a longish piece of twine – measure it against the bauble and head to see that it is long enough for hanging. Double it and make a knot at one end.
- Add LOTS of glue to the spine of the bauble, as well as one side of the bauble. Place your Unicorn Tail pieces on the paper to have a “pointing up” tail. Add your twine to the centre of the spine.
- Now take the first piece of paper and connect to the last piece. You should now have a paper bauble, with a rainbow tail and hanging from twine!
Final Assembly of your Paper Unicorn
- For the last step, take unicorn head made earlier. Find the paper bauble part that is more or less opposite the tail and glue into position.
- Finally add one leg to the segment where the tail is, one leg to segment where the head is.
Your lovely paper unicorn decoration is FINISHED!!!
Check them out here at Red Tea Art or watch the tutorial on Youtube.
